Tag Archives: Homemade

Braised Pork Chops & Sauce

23 Jan

Image

————————————————————————————————————————-

Ingredients

4 Pork Chops

2 tbsp. Worcestershire Sauce

1/2 tsp. Chili Powder

1 tbsp. Soy Sauce

1/2 cup Water

Salt or Herb Seasoning to taste (optional)

————————————————————————————————————————-

Step 1: Make the Pork sauce. First Add 2 tbsp. Worcestershire sauce in mixing bowl. Then add 1 tbsp. Soy Sauce and 1/2 cup Water and 1/2 tsp. Chili Powder. 

Step 2: Add 1 tbsp. Olive Oil in pan. turn heat to high. Once Olive Oil is warm/hot add all four pork chops to pan and braise on high heat for 1 minute. Then flip the pork chops to other side and let braise for 1 minute. Continue braising two more times on each side. 

Image

Step 3: Add Salt or Herb Seasoning to your taste if you like (optional) I chose Mrs. Dash Original Seasoning and seasoned both sides of each pork chop while braising in pan. Once pork chops start browning on both sides and begin to look cooked add Pork Mix. 

Image


Step 4: Pork the pork mix on top of pork chops. Then turn heat down to medium low and flip each pork chop in pan so that all the Pork Chops get the juice on both sides top and bottom.  Let cook in sauce uncovered for 3 minutes on medium/low heat.

Image

Step 5: Turn heat back on high. Once sauce is boiling. Cover pan with lid. Bring heat to low and let pork chops simmer for 5 minutes or until pork chops are fully cooked then serve.

————————————————————————————————————————-

Delish. 


Breakfast: Picante Hash

21 Jan

049

Homemade by Kathleen Heady

———————————————————————————————————————————————————————————————————————

Ingredients

1 cup Shredded Chicken

3/4 Yellow Onion

4/12 cups Potatoes

1 cup Green Bell Pepper

3 tbsp Unsalted Butter

1 tbsp. Olive Oil

1tsp Lemon & Pepper Seasoning

1 1/2 cup Pace Picante Medium Hot Salsa

6 eggs

1/2 tsp Garlic Salt

——————————————————————————————————————————————————————————————————————–

Serve with:

1 Slice of Wheat Toast or Cottage Cheese or Fruit

——————————————————————————————————————————————————————————————————————–

Step 1:

Microwave the potatoes for 6-8 minutes or until semi-soft. Cut potatoes in square piece.

022

Then add 1/2 tbsp. Olive Oil to pan turn heat to high and add  hash potatoes and 2 tbsp butter.

029

Then add  Onions, Green Bell Peppers  and stir for 3-5 minutes. Turn heat down to medium/high. Watch carefully continuing to stir frequently.

030

Step 2:

Prepare scrambled eggs in separate pan. First crack six eggs in pan and 1/2 tbsp. Olive Oil and 1/2 tsp. Garlic Salt on top.

037

Then batter eggs in pan or mixing bowl and add 1 tbsp. butter

040

Turn heat to medium high and scramble eggs. Cook for 2-3 minutes or until scrambled eggs are fully cooked then turn heat off.

041

Step 3:

Add shredded Chicken, 1/2 tsp. lemon & pepper seasoning to potatoes and scrambled eggs to potatoes.

045

Stir for 2-3 minutes then and 1 1/2 cups Pace Picante Salsa and mix. Stir and cook for 1-2 minutes and Serve.

060

“Liked this post? Subscribe to my RSS feed and get updates weekly!”

——————————————————————————————————————————————————————————————————————–

Mmm…yummy.

Ham & Cheese Manwich

6 Jan

108

Homemade by Kathleen Heady

I call this the Ham & Cheese Manwich. My family loves it. It’s real simple. Takes about 10 minutes to prep and 15 minutes to cook.

————————————————————————————————————————————————————————————————————–

Ingredients

6 French Dip Rolls

1lb. Black forest Ham

5 oz Onion

1-2 cups Tillamook Medium Cheese

Sauce Ingredients:

4 oz Best Foods Mayonnaise

1 ounce Kikkoman Soy Sauce

1 ounce Spicy Brown Dijon Mustard

4 oz Sweet Rays BBQ Sauce

1 ounce Worcestershire Sauce Lea & Perrins

1/2 oz Horseradish

2 Garlic Cloves

1/2 tsp. Crushed Chile Powder

Baking Tools:

Standard Measuring cup with ounce measurements.

Baking Pan

——————————————————————————————————————————————————————————————————————–

Step 1:

Mix 4 oz. Sweet Rays bbq sauce with 1 oz. Lea & Perrins Worchestire sauce. Mix.

097

——————————————————————————————————————————————————————————————————————–

Step 2:

Add 1 oz. Spicy brown Dijon Mustard, 1/2 oz. Horsraddish, 1 oz. Soy Sauce and 2 crushed fresh clove garlic and 1/2 tsp. crushed chili powder then mix.

098

—————————————————————————————————————————————————————————————————————–

Step 3:

Cut bread. Then spread Manwich sauce on the top and bottom of bread.

105

——————————————————————————————————————————————————————————————————————–

Step 4:

Add two slices ham on bread then add two slices of medium cheddar cheese. Add two more slices of ham on top. Cover with bread top.

106

——————————————————————————————————————————————————————————————————————–

Step 5:

Bake Manwiches at 375 degrees in oven for 15 minutes.

108

——————————————————————————————————————————————————————————————————————–

Let cool. Enjoy.

110


“Liked this post? Subscribe to my RSS feed and get updates weekly!”

“Birthday on a Budget,” Hand Create your next Party by Kathleen Heady

8 Jan

How to Budget Birthday Party

Looking for some ideas to save for your child’s next Birthday Bash.Here is a list of some ways that not only you can make but also have your child and friends involved. Have fun.                                                                                                                   

Homemade Invitations

This one  is great! Why not personalize your child’s invitations. There are many ways to create homemade invitations for free or little cost. You could design them on Microsoft Project Word, go online to free printout sites or you could hand make them yourself. Hand making them I must say is my favorite. Here are some very cute hand made invitations I have come across.

Space Odyssey Invitation by Martha Stewart’s .

Cupcake Invitation, Tutorial with DebbieHodge

Wand Invitations by Childhood101.com

Cake

To buy one or not to buy one. If your trying to save money then going to your local bakery may be out of the question. Your local grocery store may have some good size cakes at a reasonable price however if you really want to save. Bake it yourself,  or pay one of your close friends or friend of a friend who knows how to bake. And, if you want to do something a little more fun try making either cupcakes or cake pops for the party. Any of these can be made for under $20 and generously feed a large party. Here’s some fun recipes below for cake pops and cupcakes.

Rocky Road Cake Pops– Bet you’ve seen these at Starbucks, there delicious. Want to know how to make them yourself watch this YouTubeVideo for the recipe.

Hello Kitty Cake Pops by Bakerella.

Cupcake Ideas. 

Tron Cupcakes free printable’s at Livinglocurto.

Monster High cupcakes. You can buy these pick toppers….Or if your really creative you can print them out glue them onto another piece of paper and then adhere them onto a toothpick and Walla! Cupcake topper.

Decorations & Party Favors

For decorations stay simple.Try some of these beautiful yet very easy to make ideas to match your child’s birthday theme or buy a couple of balloon bouquets from your local party store and a birthday party banner and call it good. You can “Theme” the party up with the Cake or Cupcakes.

Yarn ballons by Design & Creative

Make your own Birthday Banner by Darling Darleen.

Party favors 

Stay simple on this one. Resist from going to the Dollar store or where ever and buying “cheapo” toys. Trust me as a parent. Parents don’t want to be coming home with more little toys to trip on. Save it and go with something sweet. Children love candy and will love the little note from their friend.

Party Hats let the kids get creative and have some fun. This Martha Stewart idea is a great activity for kids to partake in, by making their own party hats.

Try mini mason jars filled up with candy. Walmart sells them by the pack their very cheap, cute and can be decorated any way. Here’s an example: Take construction paper, print your child’s name on it then glue it to the top of the jar lid and add a ribbon around each jar.

Food & Location Ideas “Cake & Ice Cream Party”

Again keep it simple. Depending the time and size of your party, you could do a Cake and Ice cream party. Either at home or an Ice Cream parlor (check the layout first). Make sure if you decide to skip the food, it is after lunch and before dinner hours so no one comes hungry or expecting food. Also make sure the invitation say “Cake & Ice Cream Party” and make it short an hour an half. If you do this at home, make it fun, have Ice cream toppers in a variety  for each kid to decorate their own Ice cream. Have different flavors of Ice cream and fun dishes or cones ready.

“Pizza Party”

Take the kids to your local pizza parlor and have pizza.  You don’t have to worry about clean-up and the kids can invite as many friends as they want. Also it’s cheaper than reserving at a kids fun house, gym or children’s museum. You’ll end up spending less feeding everyone at a pizza parlor  than reserving at a club somewhere. It generally cost about $150-$200 on up depending on guest size  at a kids club to have a Birthday party that may only include a cake. So food cost still occur and these prices only cover between 12-15 guest  and additional guest can cost about $5 a pop. So if your planning a large party or if you have multiples in separate classes inviting their entire class then you know this can get expensive and the best options may be to take them out and have pizza and cake.

“Mexican Party”

Yes get your sombrero’s and pinatas and head to your local Mexican restaurant. You can generally reserve an entire area or room if they have one and have an awesome kids birthday party. The kids will get sung to and maybe even get free ice cream depending on the size of the party. Call or go in person to your local Mexican restaurant and speak with the manager about catering options for the party or find out how much each kid meal is.

“Public Park”

Nice weather out, why not have the party at the park. It’s generally free, though some city’s do charge a minimal fee for sheltered areas for under $50. Normally about $20-$30 upto 4 hours. So plenty of time to have a BBQ at the park and let the kids run around and spend time with adult friends.

“Water Front Sports Restaurant”

If you live anywhere close to the Ocean try to reserve a cool regular priced restaurant on the waterfront that has a good layout and lots of televisions so children can enjoy their party together and adults can watch their sports and chat.

“City Community Center “

You can rent a large room with a kitchen at one of these community centers. So again if you want to have a party outside of the home especially if it is large, try your local community center out. You can generally get a nice room for under $80 for more than two hours.

“Ice Skating Rink”

Let the kids go skate around burn off some energy. Then come back to the bleachers when their done and have some cake. For this do salad, BLT sandwiches and cake. Don’t forget soda.  This is cheap, fun and great for a small party under 10. So get your skates on and head to the rink.

Aquatic Center-“Pool Party”

This is probably one of the best especially for summer babies. Head to an outdoor pool or indoor and celebrate. Admissions is cheap generally about $3 per child and most swimming pools allow food on the bleachers. Again make your own food or hit up a McCDonalds get $1 burgers and fries and have cake. You can’t get better than this. Kids will be so entertained by swimming they probably won’t have time to eat except for the cake of course.

Barbie Closet Remodel

6 Jan


After Photo

By Kathleen heady                                                     

Barbie Closet Remodel How-to

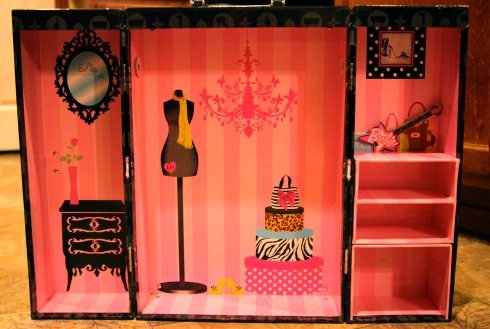
My daughter has a sturdy Barbie closet however not the most “chic” one. Her Barbie closet was actually in desperate need of a makeover. As you can see the closet was not very useful as it no longer had any bars to hang clothes, drawers to store her doll shoes or accessories. As well as no hangers to hang her doll clothes. So that’s when I stepped in and decided to do a “Barbie Closet Remodel.”

————————————————————————————————————————————————–

BEFORE PHOTO

Here is the before photo of this closet. It was in desperate need of a makeover.


————————————————————————————————————————————————–

Need creativity, a few tools and some very “chic” materials. Oh! And a glue gun is a must. So here are the basic materials needed for this project.

The List:

Scissors

Glue Gun/ Glue Sticks

Decorative Constructive Paper

Jewelry boxes or any little boxes

Ornament hooks

Jewelry Pieces

Bamboo Skewers

Glitter

Crystals

Cardboard

And…Anything else you can find

So let’s see, do we have everything?

Regardless it’s okay if you don’t. Things can be added later however, a glue gun and decor is a must. And, warning, Things are going to get pretty messy and change as you go along , you will find doing a project like this, can go in any direction as I did. For example, you may find that you want to use fabric instead of construction paper. Hopefully this project will lead you to get creative in your own way for a barbie closet project. Now before I began this transformation I found a good working spot with plenty of space.


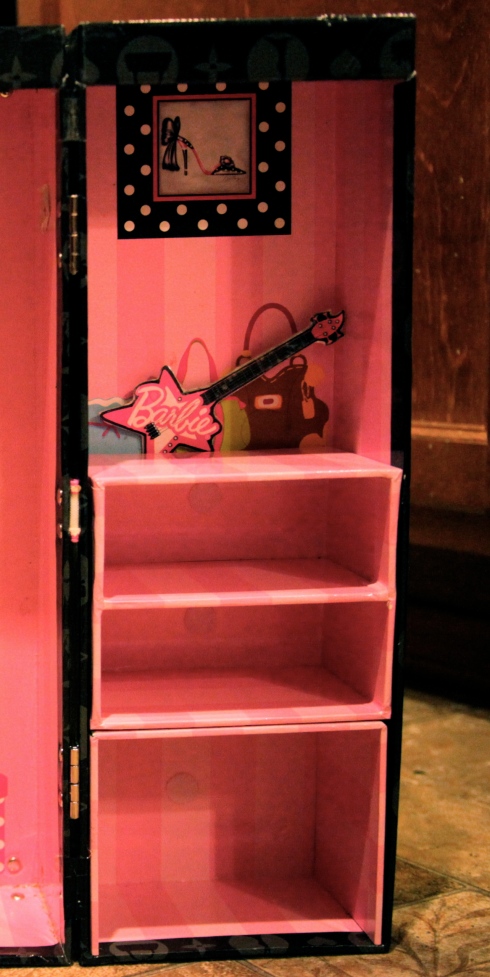
Photo of Blank Shelves

Adding Shelf to Closet

The shelves inspired me to go use jewelry boxes and insert them to fit each shelve. How I did this, was  to add another shelf to have more space for “Barbie” storage. It was really simple actually to create the new shelf with a little bit of cardboard, hot glue and constructive paper.

Step 1:

Take a piece of cardboard cut to fit size of area. Then hot glue craft paper for matching design then insert piece into closet and hot glue to the inside of walls where shelf is being added.

————————————————————————————————————————————————–

My next step, was the construction paper. This by far , was the fun part. With a small booklet of designer constructive paper I picked a variety of patterns to decorate each “barbie” storage box a little different from the next.

Before starting Step 2 & 3:

Hot Glue only one side of the jewelry box at a time as the hot glue will dry quickly. It’s also best to go slowly when laying  the constructive paper around top edges of box so that it will be straight.

Step 2:

With jewelry box in one hand hot glue each side one at a time, then apply the construction paper going around each side of the square box. As you can see below I started hot gluing the front first from one side then going around each hot glued side with constructive paper and folding the excess underneath the jewelry boxes.

Step 3:

Add crystal knobs to each jewelry box. Place knob in center of box and then hot glue it. Let dry.


Remember….BEFORE =DRAB


———————————————————————————————————————————————–

Adding Glitter

As you can see I added glitter to the top of each box as I wanted to add a little sparkle to this new and improved fab closet.

Step 3:

Add glitter. I did this with Elmer’s glue by lightly applying a little glue to the top edges of each box. Then sprinkling the glitter to the glued edges. Very simple and very fun.

Also I recommend having a handy hand vacuum nearby as the glitter part is by far the messiest part but, Super Fun!

————————————————————————————————————————————————–

Hanging Bars & Hangers

After the boxes were done I inserted the new hanging bars and hangers my daughter made herself out of ornament hooks so she could finally hang all her new Barbie clothes she got for Christmas.

Step 4:

This was simple. With a hot glue gun, take the Bamboo Skewers cut them to  fit inside of the closet, then insert each bamboo skewer in place making sure its a tight fit then hot glue.

Result: New Clothing Bars and Hangers for Barbie clothes

After Photo

Final Result: Functional Fab “Barbie” closet that not only can store barbie clothes but is beautiful and easily updated.